


Scaling Pre Roll Production: The Ultimate Guide to Pre Roll Machines
Posted by Custom Cones USA on Jul 3rd 2024
First Published: Feb 15, 2021 | Updated: July 3, 2024
To succeed in the modern cannabis industry, you need to be able to scale your production lines to meet the growing need for pre-rolled joints, the fastest growing segment of the marketplace and the No. 1 add-on at dispensaries across the country.
Adding some level of automation and machinery to your facility, including cone filling machines and other pre-roll machines will help increase efficiency and consistency so your customers can count on the same great product every time they open a pack of your pre-rolls.
Whether you are just starting out or looking to expand into new segments of this rapidly growing market, there is a pre roll machine that fits your budget and needs.
This guide is designed to help you find the right machine for your business both now and in the future, from grinders and sifters to cone filling machines and more.
But before we get too deep, it’s important to think about how you want to position your pre-roll brand. Is this a low-cost, grab-and-go multi-pack pre-roll brand or a high-end, full-flower joint for special occasions?
OK, now that you’ve given some thought to your pre-roll brand and settled on a vision for your brand position and price point, let’s get into how pre roll machines can help you achieve that!
Table of Contents- Pre Roll Machine Basics
- Cones vs. Tubes: What’s the Difference
- Size Matters
- The Right Pre-Rolled Cone for your Cone Filling Machine
- Preparing the Flower for your Pre Rolled Cones
- Pre Rolled Cone Filling Machines
- Attachments and Spare Parts
- Maintaining and Cleaning Your Pre-Roll Machines
- Automated Pre Roll Machines
- Growing and Scaling your Pre Roll Process
Pre Roll Machine Basics
Before we go any further, let’s go through the basics; when we say “pre-roll machines,” what exactly are we talking about?
Packing pre-rolled cones by hand is simply not a cost-effective way to produce large numbers of pre-rolls. And thankfully in the modern cannabis industry, it’s unnecessary. Today, there are a variety of machine options at each step along the path from flower to completed pre-roll that can make the whole process smoother and more consistent while creating a better final product that customers can expect and count on.
There are three main categories of pre-roll machines that can help take you through production: grinders, sifters and cone filling machines.
We like to say it all starts with the grind, because that is what takes your flower from its form as buds and transforms it into particles that are a usable size for packing into pre-rolled cones. However, there are multiple grinders available on the market that use different methods to create those particles, each with their own pros and cons that affect the final product, all of which we will address.
The next step for which a pre-roll machine can help is sifting, which is often overlooked but in reality, vital to producing high-quality pre-rolls. Sifters help ensure consistent particle size and remove stems, seeds and other bits that can tear your pre-rolled cones or create hot spots that lead to canoeing, or your pre roll burning faster down one side. The right sifter, along with the right size screens, is a must-have for any pre-roll production line.
Finally, and most importantly, comes the cone filling machine itself. Designed to physically fill and pack pre-rolled cones, these machines are the single most essential and common pre-roll packing machine found in the cannabis industry, though there are multiple options, sizes and price points that must be taken into consideration. From tabletop bumpboxes to modern, automated pre-roll infusing machines, there are now pre-roll machines for every level of production, each with their own pros, cons and nuances that have to be taken into consideration to find the one that’s right for you and your business.

Cones vs Tubes: What’s the Difference?
The first choice pre-roll producers have to make is whether to pack your flower into cones, tubes or both. And while similar, the two products are different in some important ways, including in how they work in pre roll machines.
We have close to unlimited pre rolled cones and pre roll tubes shape and size options. We can make any top diameter, bottom diameter, cone/tube length, or filter length. What's important to keep in mind when making your decision is your branding, the smoking experience you are going after, packaging, and how much material you want to fit into the cone or tube.
The main difference between the two pre-rolled products is the shape. Pre rolled cones are conical, like a funnel, with a narrow filter end that grows to a wider opening where the weed is packed. This allows for larger hits at first and then smaller hits as the cherry burns down, which is great for smokers as the hits closer to the filter are often coated with resin and burn hotter.
Pre rolled tubes, on the other hand, are cylindrical in shape, like a cigarette, maintaining the same width throughout the smoke. These create a more consistent smoke all the way through the tube as every pull has the same amount of cannabis as the one prior.
However, not all pre-roll packing machines work with both cones and tubes, so it’s important to know what you plan on making before you go all in on a pre roll filling machine.
Finally, decide which will look better in your packaging, branding, and product displays. For example, if you plan to use cigarette boxes for your pre-roll packaging it might behoove you to go with the pre-rolled tubes to create a familiar experience for tobacco smokers who are venturing into cannabis.
Size Matters
After selecting a pre-rolled shape, manufacturers must next decide how big a pre-roll they want to produce.
Pre-rolled cones come in a variety of sizes, each holding a different amount of flower and appealing to a different type of smoker. At Custom Cones USA, for example, we make cones that will hold a full 1 g, .75 gram, a half gram and smaller, personal options that will hold .25 to .33 grams, like our “Dogwalker” cones.
Industry standard for pre-rolled cones are 109mm, 84mm and 70mm, each with a 26mm filter that allows it to fit in most pre-roll machines.
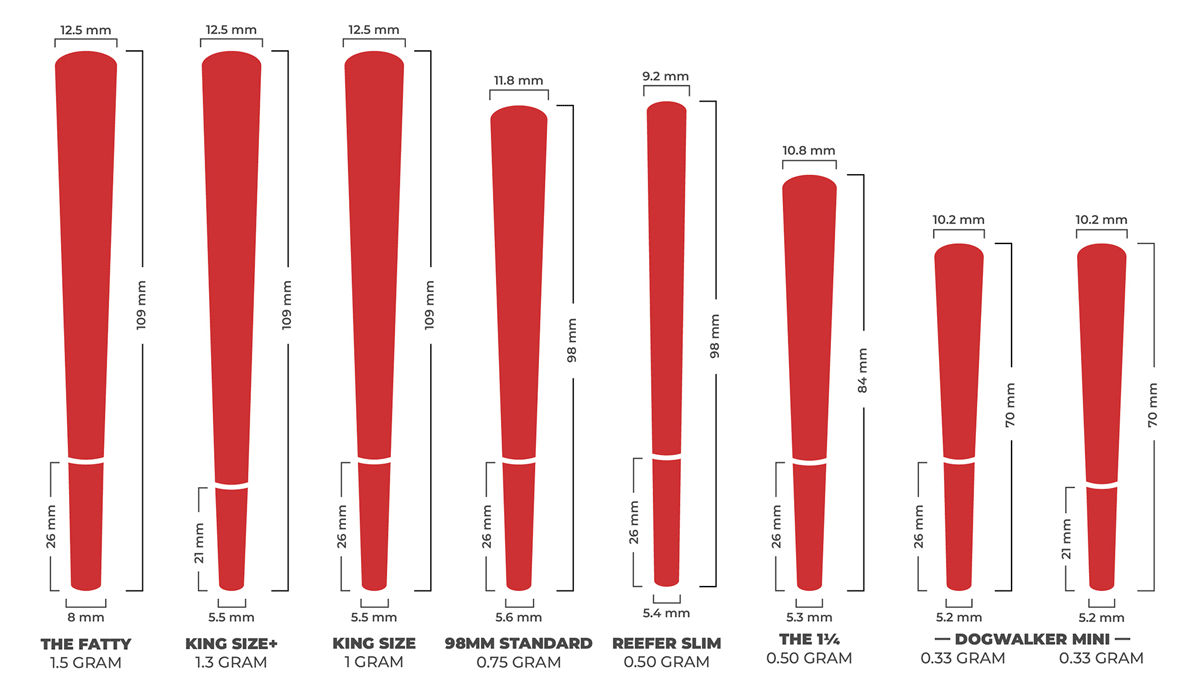
Each weight translates to a standard size pre-rolled cone. The most common and most popular choice is the 109mm cone, which will hold a full gram of flower, depending on particle size and moisture content, of course. These are also known as “King Cones.”
For half gram pre roll joints, an 84mm pre rolled cone is the primary go-to, though there is a second, slimmer option available, the 98mm Reefer cone which has a narrower shape but will still pack in a half gram.
The 70mm cones are ideal for smaller pre-rolls, such as the “Dogwalker” size popularized during the pandemic. They will hold about 1/3 gram of flower and come with an option of either a 26mm or 21 mm filter tip.
Pre-rolled tubes come in fewer size options, primarily 109mm and 84mm, which will hold a full gram and half gram, respectively.
There are also larger tube options for manufacturers interested in producing pre-rolled blunt, such as the 109mm blunt tube, which has a wider diameter than the standard pre-rolled tube and will hold up to 2 grams.
Knowing what sizes of sizes of pre-rolled joints you want to produce will help make it easier to select the right pre roll machine.
The Right Pre-Rolled Cone for your Cone Filling Machine
Choosing your pre-rolled cone is not a simple decision – there are a multitude of factors which will affect your final choice.
Are you planning on a single pack offering? If so, you probably want to offer at least a .75-gram pre-roll or larger. However, if you are offering a 5- or 10-pack, then you most likely want to offer half-gram pre-rolls or smaller. This will help you keep the multi-pack affordable.
The size of your cone or tube also helps to create the image you want for your brand. Dogwalker cones (70 mm) are fast and efficient smokes for a brand catering to the on-the-go lifestyle. The 98mm Reefer-style cone is tall and statuesque like a Virginia Slim, but holds a half gram like a traditional 84mm cone, compared to .75 grams of traditionally shaped 98mm pre rolled cones.
In addition to the size of your cone, you have the choice of paper and of filter type as ways to help differentiate your pre roll brand. Is it the popular ultra refined white? Or the slightly less refined natural brown to distinguish yourself? How about the 100% organic hemp paper pre rolled cones for brand with an eco-focus?
All of our cone sizes are available in all three paper types and have a traditional, standard “w” style filter. Other filter choices include a spiral filter – standard in our pre-rolled tubes – and additional premium filter tips like wood, glass or ceramic, that lend an air of luxury to your pre rolls.
While most pre-roll machines will handle a “w” or spiral filter, not all pre roll machines can handle the premium tips, so be sure to read on if you are planning to include these in your product line.
Preparing the Flower for your Pre Rolled Cones
Before we reach the cone filling machines, we hit the first step where a pre roll machine can help your production process: flower preparation. And for that, it all starts with the grind.
Grinding Pre-Roll Machines
Properly grinding or milling your cannabis flower is not just another step in your production process — it’s a foundational piece that can make or break the quality of your pre-rolls.
Poorly ground cannabis leads to inconsistent particle size and gaps inside the cone, often resulting in pre-rolls that run or “canoe” due to disrupted airflow. This not only affects the smoking experience but also impacts the potency that customers can expect from your product.
A poor grind also leaves you with chunks and nugs that can wreak havoc on your pre-roll machines. These larger particles make it difficult to produce evenly packed pre-rolled cones and tubes, which can ultimately hurt your bottom line. It is important to choose the right option for you, otherwise you may overspend for what you need or you may use a sub-par solution, which will end up costing you more on the back end. You have 3 levels of options here: Low-Volume, Mid-Volume, and High-Volume cannabis milling machines.
If you are on a budget you are limited to a low-volume grinder, like a blender or food processor. These can be picked up from any home goods store for $50 - $350. They will grind your flower down as their only use.
However, there are a few issues with using a blender/food processor as your grinder. First, you are limited by the container size of the blender/food processor. Next, when you grind in a blender or food processor you have no control over the final size of the cannabis particles. You will end up with some dust, some small particles and some larger clumps.

An uneven particle size is less than ideal as it will affect not only the efficiency of your cone filling machine, but the lack of consistency also means your final pre rolls won’t all weigh the same, so may have to either add or remove cannabis from your pre-rolls before twisting.
Finally, and perhaps most importantly, a blender/food processor uses a high-RPM motor, which whips around the blades at a very high rate. This generates a lot of heat which can damage terpenes and trichomes on the flower.
For companies that can spend more on a grinder, then you can begin to look at some of the mid-volume grinders. There are two main options currently; a weed whacker style grinder and our industrial grinder.
The main benefit to the weed whacker grinder is high speed grinding – with a large enough container you can grind down 2-3 pounds per batch, within 50-60 seconds. But the drawbacks are the same as the blender/food processor: there is limited control over particle size, you are limited by container-size, and heat generation due to the high RPM motor.
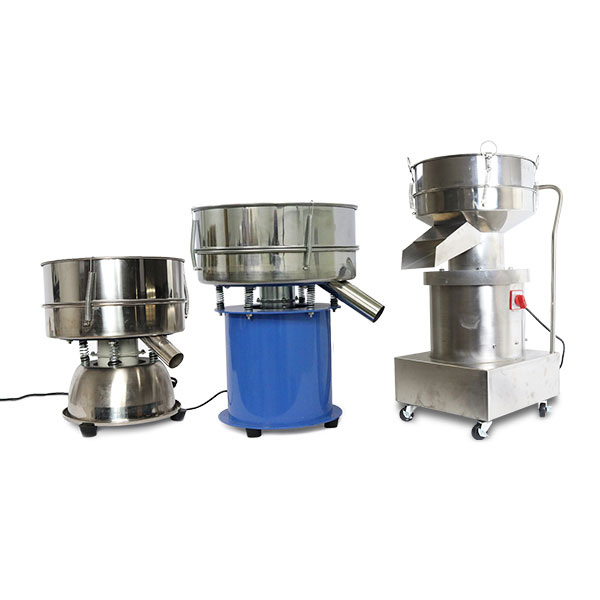
Our industrial grinder on the other hand uses a low-RPM high-torque motor, which means the blades move around slower, creating less heat. The design of the grinder is based on screens; the blade grinds the cannabis through a specific sized screen – allowing you to control the final particle size of the cannabis.
For the largest producers, there are higher volume machines capable of grinding 200-300lbs per hour, like our Industrial Cannabis Grinder XXL.
Whatever you chose, remember: a low RPM, high torque cannabis grinder will help you achieve your desired grind while preserving the valuable compounds present in cannabis. Not only will this help you optimize your pre-roll production, but it will also help you meet the expectations of even the most discerning customers.
Sifting Pre-Roll Machines
Nearly as important as the grind is the sift. Though often neglected, sifting is a crucial step that removes any stems that get through the grinder, along with any other foreign material or large particles that might tear or break your cones when you go to fill them. It's a simple step but if skipped it can lead to uneven, broken and overall poor-quality pre-rolls.
The sifter also helps ensure an even particle size distribution across the ground material. That means that each individual particle is a similar size to the particle next to it.
Scientists who studied the effect of particle properties on the flowability of ibuprofen powders found that, for powders with a narrow size distribution, the flowability increases significantly with the increase in particle size.
When we provide a grind which is not a fine powder and we ensure that the ground material has a narrow particle size distribution, we will see improvements in flowability. Therefore,it is extremely important to be focused on your particle sizes and the distribution of particle sizes.
By controlling the size of our particles through our grind and narrowing our particle size distribution through our sifter, you can create a free-flowing powder, which will allow you to make pre-rolls that are well packed throughout from crutch to tip. Not only will you make better pre-rolls, but you will make pre-rolls faster.
And in commercial pre-roll production, consistent particle size is more important than you might think.
We did a run with un-sifted material and the weight variance was 65% higher than the sifted material. The number of pre-rolls that had a hole due to stems was 488% higher than the sifted material. The number of pre-rolls with an unsatisfactory pack was 194% higher than the un-sifted material.
Out of a run of 169 pre-rolls, you will get 27 more pre-rolls when you use sifted material versus un-sifted material. When you start to think about scaling up your production, the value of a sifter becomes clear.
For the purposes of our experiment, we used our QuickSift Mini, but you can also purchase two larger-size sifters: the Quicksift Commercial and the QuickSift Industrial, which easily accommodate larger volumes. Each of them can be purchased with a variety of different mesh screen sizes to get exactly the grind consistency you want for each of your flower strains.
This is even more important if you are using an automated pre-roll filling machine, because consistent particle size is a necessity to keep things moving, with some machines even requiring exact sizes to work properly.
Beyond the speed, consistent particle sizes lead to better-packed pre-rolls. And better packed pre-rolls are better smoking pre rolls.
This is because different sized bud particles burn at different rates, with smaller particles burning hotter and faster than larger ones. Different particles sizes also prevent smooth airflow through the pre-roll and can lead to uneven packing or gaps inside the pre roll. All of these can lead the pre-roll to canoe or run, burning unevenly down one side of the cone.
Now that you have chosen your flower and your grinder/sifter process, it’s time to tale cone filling machines.
Pre Rolled Cone Filling Machines
A pre-roll filling machine is a device which allows for rapid filling of pre-rolled cones. While an individual may be able to package a handful of cones per minute, a pre roll cone packing machine can fill 100 or more pre rolls every few minutes. But again, there are choices, ranging from manual to electronic, tabletop vs automated and more.
So, how does a pre-roll filling machine work? To simplify things, let’s break it down into 3 parts: the Vibratory (base) level, the Lower, and the Upper filling level.
First, pre rolled cones are loaded (crutch side down) into individual compartments at the lower level of the machine. Next, ground flower is placed in the upper tray, with an opening for each cone. Once the tray is filled with ground material, it is placed above the pre rolled cones. The pre-roll roll filling machine now has pre rolled cones at the lower level, with ground material ready to be loaded at the top level.
The third step, once all levels are properly assembled, is to start vibrations, which causes the ground material to fall perfectly through aligned openings into the individual pre rolled cones. The upper level is replaced with ground material and the process repeats itself until the cones are properly filled.
To put it bluntly, a pre-roll machine uses vibratory shear forces, gravity, and volumetric filling to load the desired material into pre-loaded cones.
Once you have filled your pre-rolled cones in the machine you will now need to weigh them in order to make sure that the final weight of the pre-rolled cone is within regulation. For most states the final weight can be off by between 5-10%. Right now this is a manual process and you must weigh each pre-roll adding or subtracting cannabis as is necessary.
Once you have finished weighing the pre-roll and getting it to the correct you may want to do a final tamp on the pre-roll to tighten the pack a little more than the machine itself will do. Pre-roll manufacturers will generally just use a small metal rod to do the additional tamping. Or if you purchase the Fill n Fold Starter Kit - there is a folding/tamping tool which allows you to fold down over 11 pre-rolled cones at once. Check out the King Kone and our Fill N' Fold selection.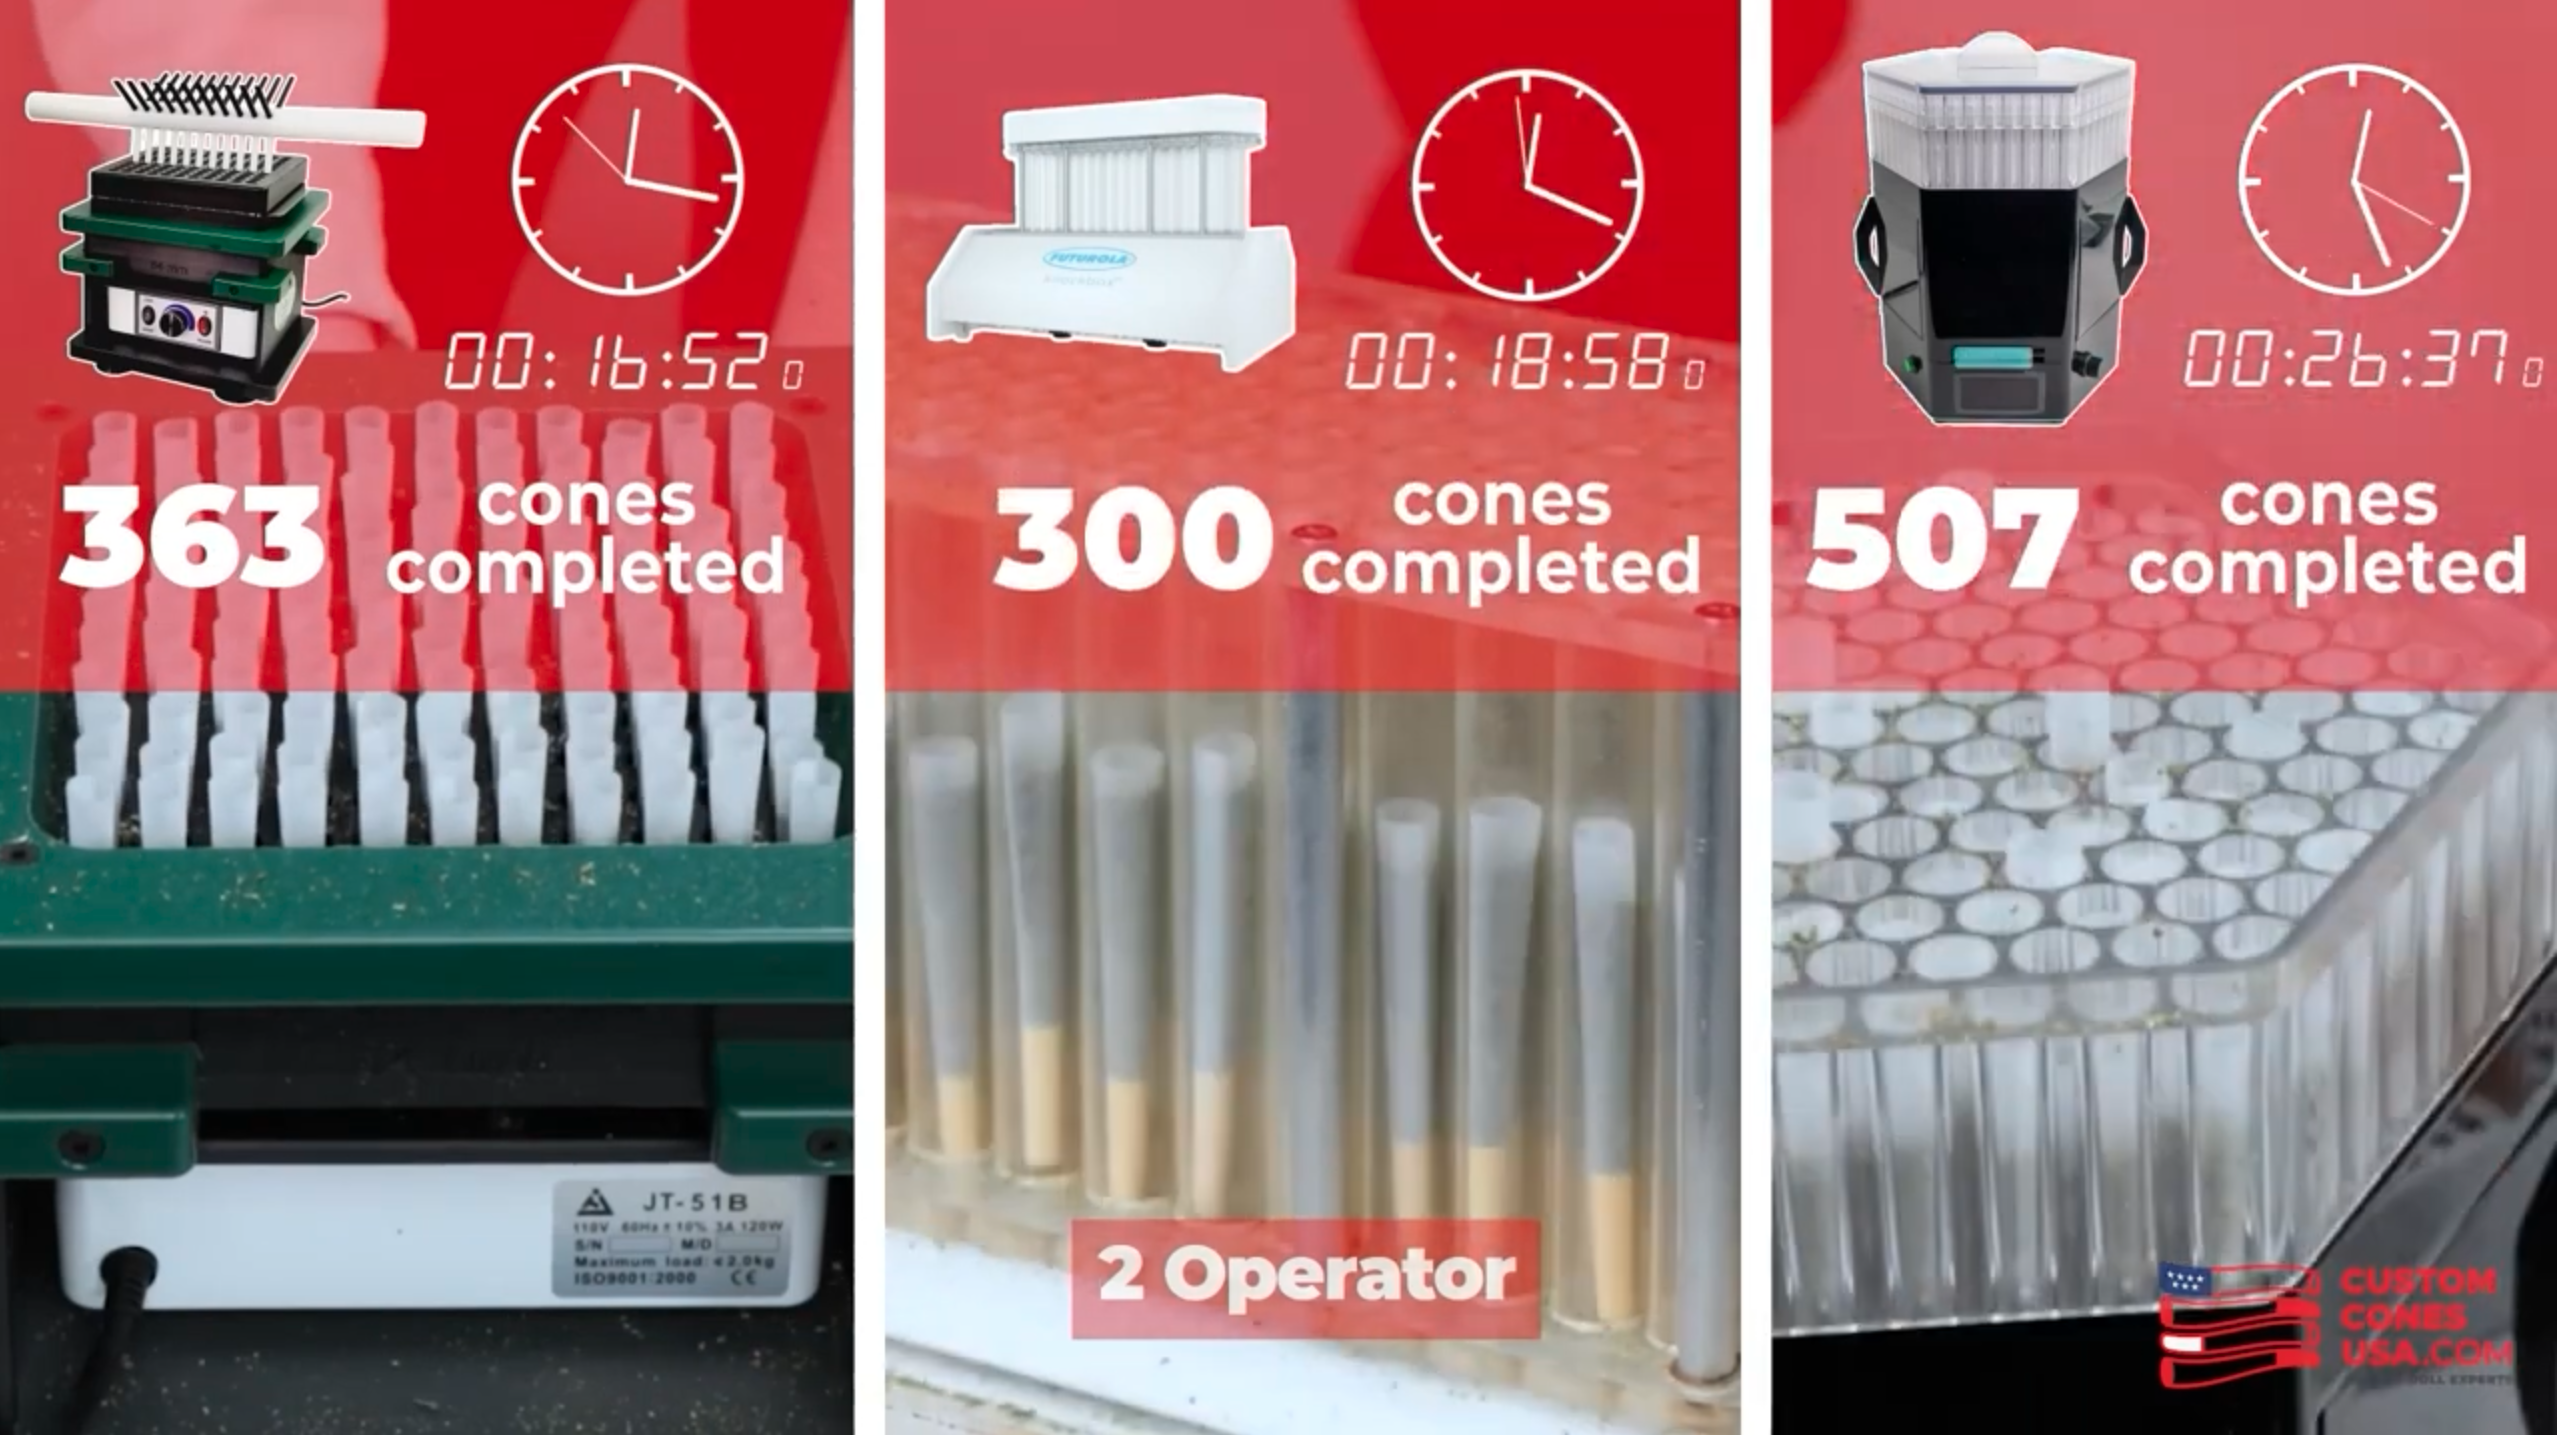
Pre Roll Machine Types
There are multiple different types of cone filling machines to choose from, depending on what is right for your product line and budget.Tabletop cone filling machines
The smallest cone filling machines are mostly designed for consumer use at home, like the Perfect Pack machine, which fills a single cone or tube at a time in a matter of seconds. While perfect for the home-packer, and certainly a step up from hand-packing your pre rolled cones, its size has limitations that make it less than ideal for larger pre roll manufacturers.
For pre-roll producers, the best tabletop machines are small, electronic devices capable of producing at least 100 pre rolls per run, like the King Kone or Fill N’ Fold.
The King Kone Cone Filling Machine

The King Kone machine is a tabletop machine that takes up very little room, but unlike similar machines, includes an adjustable motor that provides the up-and-down bounce to perfectly pack up to 169 cones at a time. It is perfect for both small and large farms, as its modular design is very friendly for assembly line manufacturing processes.
The King Kone pre roll machine comes fully assembled and ready for use. It is user-friendly and easy to use, so any staff member can easily be trained to use the machine. It’s as easy as loading product, touching a button, and turning a knob!
What makes the King Kone different is that it uses a motor to drive the platform up and down, gently bouncing the cones themselves to create an even fill across the entire platform. This motion creates a tighter pack at the bottom, providing a superior pack with just the right amount of flowability for a smoother, even burn. A higher-quality pack for a higher-quality toke adds value to your product that will keep customers coming back for more.
The King Kone can pack a variety of sizes of pre-rolls with ease. The base tray is able to pack half-gram 84mm cones and .75 gram 98mm cones. An extension attachment tray also comes in the box, which will allow you to pack full-gram 109mm king cones. More sizes are available for purchase, and if any other sizes are needed that are not available, we are happy to custom-build trays to fit any size pre-roll you need.
There is also an available tube conversion kit, which is compatible with tube inserts to pack pre rolled tubes. Purchase multiple inserts of varying sizes so you can pack wider diameter or narrower pre rolled tubes in the same pre roll machine you use for pre rolled cones. You can also get a King Kone Tube Tray to pack more sizes of tubes including 9mm, 10mm, 11mm, 12mm, or 13mm.
Additionally, the King Kone’s fully modular design allows it to come apart for cleaning and maintenance, and each piece can be replaced on its own if anything happens, so you won’t need to invest in a new machine. Add a grinder and sifter to create the King Kone Starter Kit and get everything you need all at once!
The makers of the King Kone also recently added the King Kone Closer to their line of pre-roll cone-filling machines, making it easier and faster for employees to close filled pre-rolled cones.
The King Kone Closer is a table-top device with a large lever that is designed to close an entire tray of filled pre-rolls with a few simple, repeatable steps. It is sold separately and can be used with any major pre-rolled cone size.
The Fill N’ Fold Cone Filling Machine
The Fill N’ Fold is a similarly sized pre-roll machine to the King Kone, but it varies in a few important ways, including how its motor functions and, most importantly, the accessories it comes with.
The Fill N’ Fold uses a powerful vibrating motor to pack 121 cones at a single time and comes with a special tamping and folding tool to both pack down and fold over the paper on 11 pre-rolls at a time, vastly speeding up output compared with individually folding or twisting each pre-roll as it is removed from the machine and increasing the efficiency of your production line.
On the other end of the production process, Fill N’ Fold has addressed the pre-production slowdown of loading pre-rolled cones with the Fill N’ Fold Cone Loader.
This compact and handy device consists of two boxes, each with a pair of latches, that when engaged and disengaged in the right sequence allows workers to load full tower box stacks instead of single cones and then drop a layer of up to 121 cones at one time. However, unlike the folding and tamping tool, it is sold separately.
Each Fill N Fold comes with the motor base, the tamping/folding toll and two trays: a work tray and a volumetric metering tray in the size of your choice. Plus, each sturdy and durable metering tray comes with shims to help you fine tune the amount of flower to ensure an accurate amount fills into your pre-roll cones every time.
Available in sizes for 70mm, 84mm, 98mm,and 109mm pre-rolled cones, this cone packing machine has the fastest start-to-finish time of any cone filling machine we’ve seen. Combine the Fill N Fold with our industrial cannabis grinder and a sifter for the perfect starter kit for any pre-roll production line.
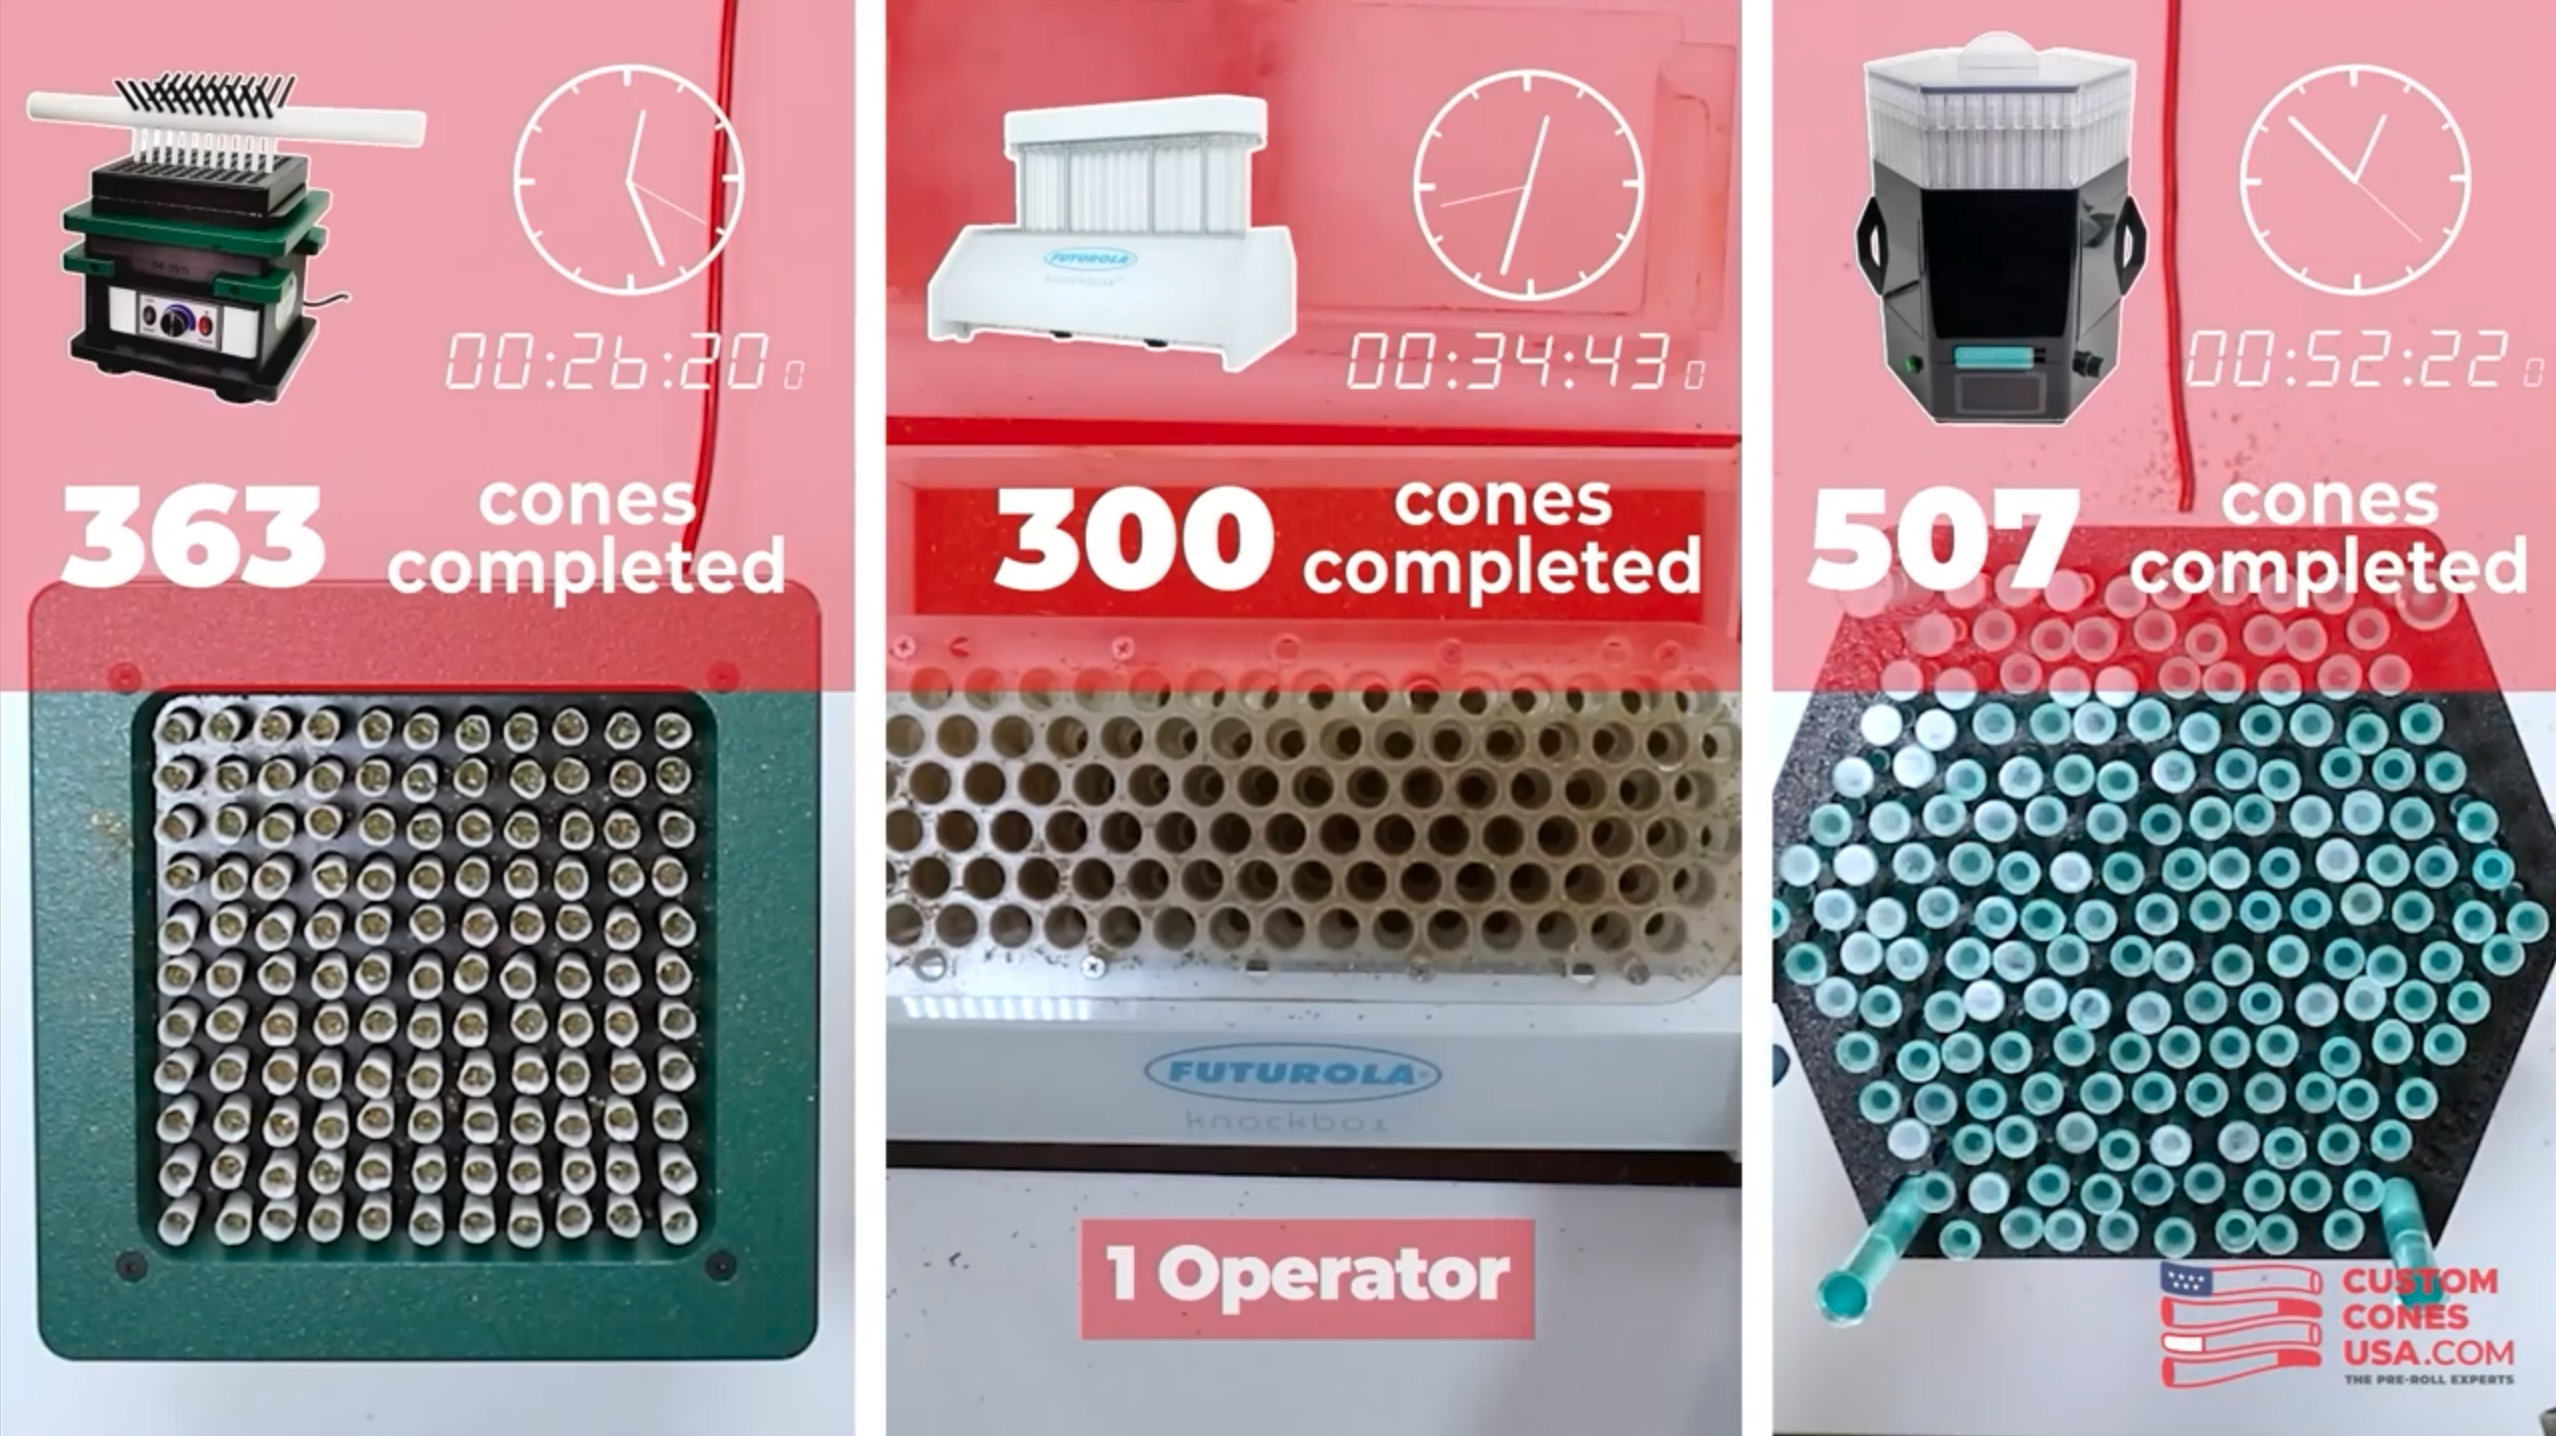
PRE ROLL EXPERT PRO TIP: The number of holes, or slots, in any given cone filling machine is NOT a reliable estimation of output or throughput for the machine. We call this “The Holes Fallacy.” When factoring throughput, the whole process must be considered, including removal and closing of the cones, a step that can add significant time to your pre roll production schedule.
We ran some tests to check the throughput of the Fill N’ Fold vs. The King Kone vs a traditional KnockBox. Check out the results: Battle of the Pre-Roll Machines: King Kone vs. Knockbox vs. Fill n Fold.
Non-Traditional Cone Filling Machines
For companies interested in investing in an electronic tabletop machine that’s a bit different, the Hummingbird PR-1 Pre-Roll System is an excellent option. A newer machine, the Hummingbird eschews vibration entirely in favor of using centrifugal force to fill pre-rolled cones.
The spinning motion used by the Hummingbird helps pack higher-density material near the crutch for support and lower-density material near the tip for ease in lighting and a smooth density gradient in between to help create a more consistent-burning pre roll.
Designed, built and used by successful pre-roll manufacturers, the machine can pack dozens of cones in every 60-second cycle, using specially designed, color-coded pods of various size to hold pre rolled cones or pre-rolled tubes of different lengths, from dogwalker mini-cones to 109mm king cone pre rolls and, using different pods, tubes up to and including 2-gram blunt tubes.
The pods also make for a quick and accurate metering system that add to the versatility of the Hummingbird, and with the ability to run multiple pods at the same time, you can pack multiple cone or tube sizes at the same time.
Though more expensive than other, smaller options, the Hummingbird PR-1 cone filling machine is a perfect, reasonably priced option for a company looking to scale up from a smaller tabletop pre-roll machine. With the ability to fill pre-rolled cones and prerolled tubes of all sizes, the PR-1 can help you expand your pre roll joint line quickly and easily while not breaking the bank.
Infused Pre-Roll Machines
While the pre roll is the fastest growing sector of the cannabis market, the fastest growing category within that sector is infused, or connoisseur pre rolls. These premium pre rolls include both flower and a cannabis concentrate to increase both flavor and potency.
If you are infusing your pre rolls externally by painting on distillate and rolling the completed product in kief, then the machines already mentioned are enough to help scale your production line.
However, if you are looking to infuse your pre rolls internally, either by mixing a concentrate with flow or injecting a concentrate into your prerolls, then a new pre roll machine may be in order.

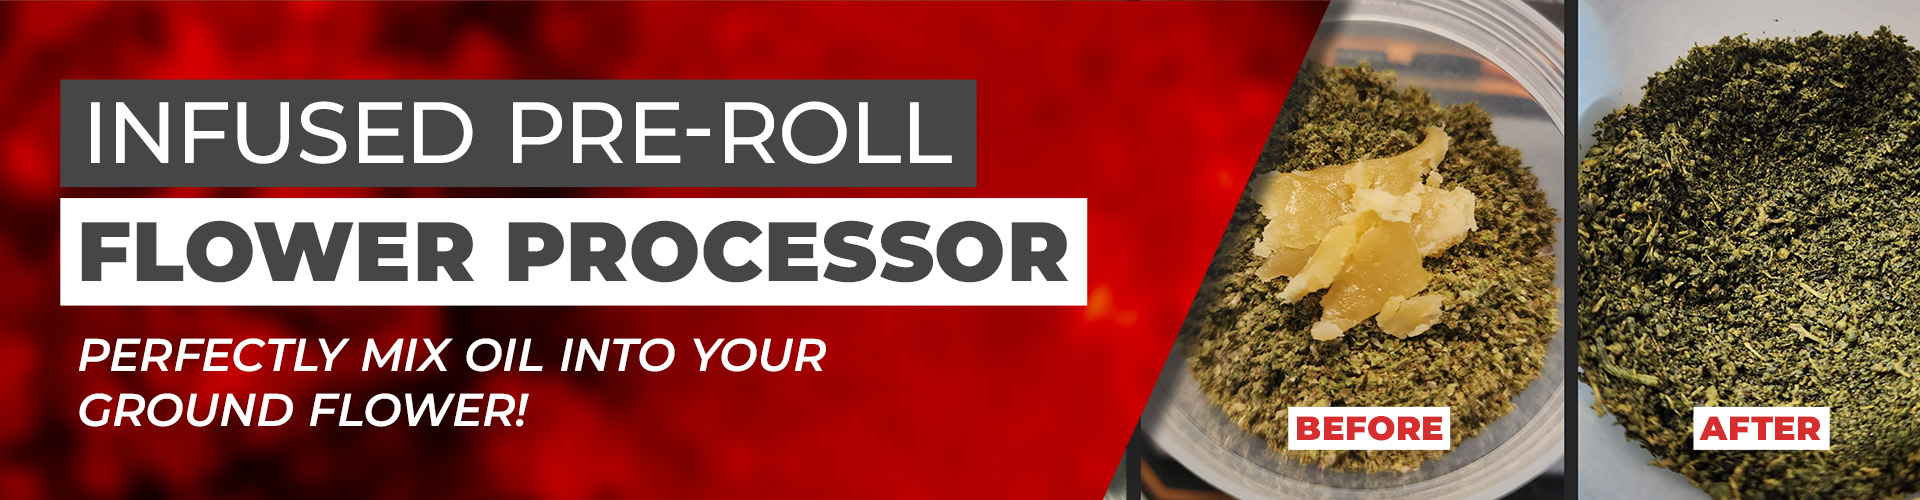
Mixing flower and concentrates is a difficult, messy procedure that is hard to get right. However, the new Infused Flower Mixer is a pre roll machine that can ensure a perfectly homogenized mix of any flower and any concentrate every time thanks to its dual centrifuge technology.
Pre-roll companies can literally just pour a concentrate on their flower and the Infused Flower Mixer handles the rest, using physics to make sure the two substances are properly and fully mixed and ready to be placed into pre-roll cones, reducing the steps necessary to create perfectly infused pre-roll joints.
The machine also works to perfectly infuse your cannabis with terpenes to enhance the flavor of your prerolls and can be used to purge your concentrate in a fraction of the time and without the heat time used in a vacuum oven.
To speed up the process of external infusion, there is the KL-120 Joint Coating Machine. It uses rollers and a pair of individually controlled reservoirs to evenly coat the outside of a filled pre-roll in preparation for being kiefed. With just two workers, the machine can fully coat up to 7,000 pre-rolls per hour, drastically speeding the production of infused pre-rolls.
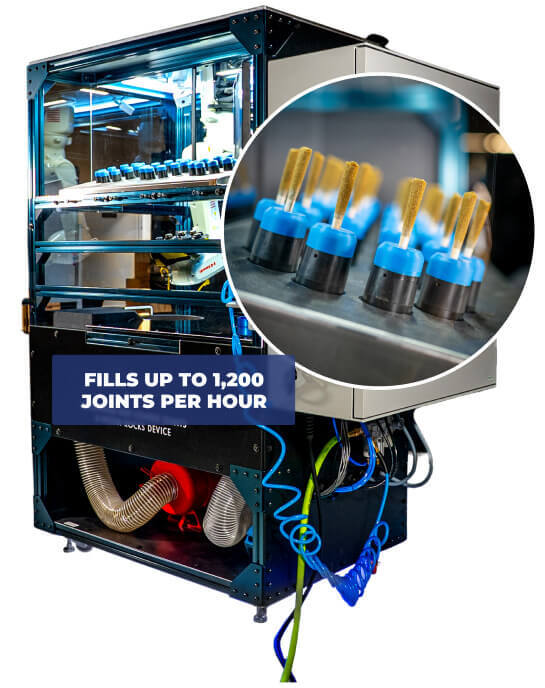
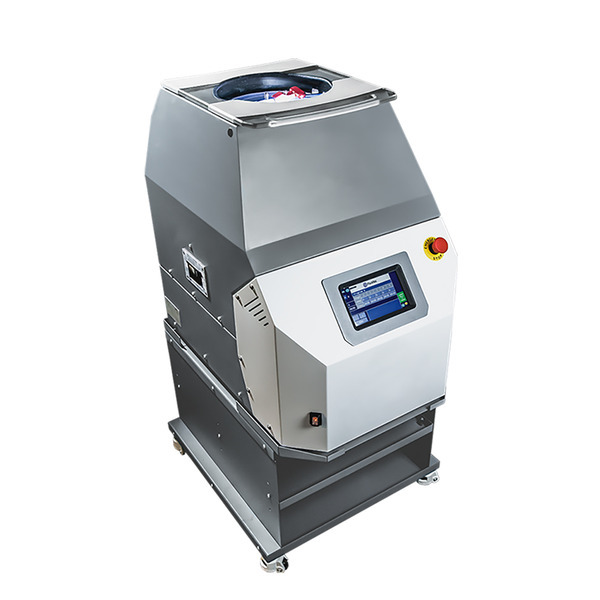
For companies that want to inject a concentrate into the center of a pre roll to create a “hash hole” style option, the Automated Infused Pre Roll Machine is the way to go. A specially designed and patented reservoir heats up your oil, which is then fed through a medical-grade needle and into the center of your finished pre-rolls.
Up to 20 pre-rolls at a time are loaded into a circular cartridge, which rotates under the needle, where a rod of oil is placed perfectly in the center of the pre-roll, all controlled with a touch screen to allow for repeated precision and consistency. You can not only set the desired length of the infusion, but also where it starts and stops.
This machine has also been designed to be easily run and calibrated by a single operator, cutting down on labor costs and man-hours. Plus, it outputs all your production data into an easy-to-read format, so you can keep track of production and optimize your process for maximum efficiency.

Attachments and Spare Parts
For maximum efficiency, we recommend buying additional attachments and spare parts to allow your staff to continue producing pre rolls throughout the day, no matter which pre roll machine you chose.
WIP Trays for Cone Filling Machines
Of foremost importance are Work In Progress Trays, a simple and convenient tool to hold pre-rolls, perfect for those that have been filled but not yet closed.
The pre-roll Work In Progress tray can hold up to 96 pre-rolls at once in an upright position to ensure that they keep their shape and don't get damaged before the final weighing, tamping and folding. This simple tray is an easy addition to your pre-roll filling process as it adds an additional layer to keep track of how many pre-rolls are being filled and keeps your pre-roll filling process streamlined and organized. Perfect for Quality Control, these trays are also great for infused pre-rolls, so you can paint and kief the sides, without creating a mess or ruining the sides of the pre-roll.
The pre-roll work in progress tray works with all cones and 1 gram hemp wrap tubes.
Metering Trays for Pre Roll Machines
A volumetric metering tray is a simple way to speed your production by providing a consistent fill amount that perfectly fits on top of your cone filling machine.
Since table-top pre-roll machines don’t have scales to weigh the amount of flower going into each cone, the metering tray helps ensure the same volume of flower falls into each cone.
And the key word here is "volume" - the metering tray is not actually weighing the flower, but since each hole is the same volume, in theory, the same amount of flower should be getting dropped into each cone. That said, some strains are naturally denser than others, so a denser strain will weigh more in the same volume as a lighter, fluffier strain.
Both the King Kone and Fill N’ Fold utilize metering trays, though there are some differences. The King Kone offers three sizes of metering trays, 0.35 grams, a half-gram tray and .7 grams. To use metering for a 1-gram pre-roll, you’ll have to use the half-gram size twice. The King Kone also comes with a clearing tool to help remove sticky cannabis.
The Fill N Fold, on the other hand, comes with a work tray sized specifically for a single cone size, and the corresponding metering tray to go with it. Though the motor will work with any sized work tray, each size must be purchased separately, including the metering trays, which are available for all sizes.
The Fill N’ Fold also comes with 2 thin, plastic shims to add a little height to the metering tray, providing a little more filling volume on a single metering tray, making each tray slightly adjustable for different flower types.
Tube Conversion Kit for the King Kine Filling Machine
As mentioned, the King Kone can be used for both cones and tubes, with the addition of the pre roll machine’s tube conversion kit.The kit fits right on top of the King Kone and is compatible with tube inserts to pack pre-rolled tubes. To get the most out of your King Kone conversion kit, purchase multiple inserts of varying sizes so you can pack wider diameter or narrower pre-rolled tubes in the same pre-roll machine you use for pre rolled cones.
Spare Parts for Pre roll Machines
To keep things running smoothly, all pre roll machines have to be regularly cleaned, which can lead to downtime. Unless you also have spare parts on hand to continue production, of course.
Form additional hopper pans, bucket chutes, bucker attachments and extra cannabis containers to additional screens of all sizes these will keep your industrial cannabis grinder smoothly.
There are additional work trays, buckets, catch trays, metering adjustments and a metering tray cleaning tool available for the Fill N’ Fold.
The King Kone also has a range of options from additional metering trays to cones size kits and tamper attachments to keep you up and running with minimal down time.
Maintaining and Cleaning Your Pre-Roll Machines
As noted, for your pre-roll machine to work properly, regular maintenance is required. If too much resin and plant material builds up inside, the motor might overheat from working too hard. In worst-case scenarios, this can lead to your motor getting burned out.
If your pre roll machine breaks down due to a lack of cleaning, it will bring joint production to a standstill, and, when you can’t get products to market, it negatively impacts your bottom line. The best way to keep pre-roll production at 100% is to ensure your equipment is properly maintained. This notion is particularly true with an automated pre roll machines that have many moving parts.
Be sure to wipe down with isopropyl alcohol all of the metering trays on your preroll cone packing machines, as well as the machine itself. Grinder blades and screens are easy to remove for cleaning. Since they are made of stainless steel, wiping them down with isopropyl alcohol will quickly loosen resin and plant material. After that, give your grinder blades and screens a quick scrub and they are good to go!
And don’t neglect the grinder blades and screens on your industrial cannabis grinder or the screens and funnel on your sifter. Sifter screens and funnels are simple pieces of equipment that are very easy to clean. These stainless-steel pieces of machinery can be wiped down with isopropyl alcohol to quickly loosen resin, and the bottom tray and funnel can be easily cleaned with a brush.
Just be careful not to get the motor wet when cleaning. If the sifter screens are clogged with resin and flower material, your sifting process will be less accurate and significantly slowed down.


Automated Pre Roll Machines
The final thing to consider when scaling your business is the jump to a fully automated pre roll machine, though it’s hard to know exactly when it makes sense to take that financial leap.
Automated pre-roll filling machines can make between 1,000-3,000 pre-rolls per hour. So when it comes to buying an automated machine, the math for most companies begins to make sense at more than 50,000 pre-rolls a month, which is pretty rarified air for a producer; less than 10% of companies make that many.
However, there is more to think about than just the upfront cost.
One consideration is the type of flower and/or oils you plan on packing into your pre-rolls. If your flower is too sticky, automation may not work as well as other cone-filling methods and machines. Additionally, automated machinery works best with consistent inputs and if you are planning on making pre-rolls containing multiple of strains of cannabis – or if your cannabis source is not consistent – then automation could increase your turnover time between production runs and ultimately slow you down.
One final thing to take into consideration is your product line itself: what type of pre-rolls do you make and sell? Again, automated filling machines work best when all things are consistent. If you are planning on a wide range of SKUs, the turnover time from pre-roll to pre-roll might not be worth the purchase.
Additionally, not all automated machines can fill both pre-roll cones and pre-roll tubes, so be sure to take that into consideration when looking to move to an automated production cycle.
Growing and Scaling Your Pre Roll Process
In the end, choosing the right pre roll machine and cone filling machine depends entirely on your business, your pre-roll line and your plans for the future.
Start with the pre rolls you hope to create and then work backwards to ensure that the pre roll machine you buy works for your business. Then, choose a grinder and sifter before deciding whether you need an electronic pre roll machine or not.
For smaller businesses, the right tabletop cone filling machine can make all the difference, whether its the increased versatility of the King Kone or the enhanced speed and throughput of the Fill N’ Fold.
Larger business may want to consider the Hummingbird PR-1 or make the jump to full automation.
And with infused pre rolls on the rise, consider the Infused Flower Mixer to perfectly homogenize flower and concentrate or the Automated Infused Pre Roll Machine for perfectly precise hash hole style pre-rolls.
Finally, when your company is ready, there is full automation.
But whatever pre roll cone packing machine you buy, make sure to pick up spare parts to keep everything running smoothly.
With the right machine and the right partners, like the Pre-Roll Experts, your pre roll business will be ready to make the leap to the next level in no time.
To succeed in the modern cannabis industry, you need to be able to scale your production lines to meet the growing need for pre-rolled joints, the fastest growing segment of the marketplace and the No. 1 add-on at dispensaries across the country.